


- Home
- Injection Moulding
- Why Draft Angles Matter in Injection Moulding
Why Draft Angles Matter in Injection Moulding
If you’re designing a part for injection moulding, one of the most important – and often overlooked – considerations is the draft angle. It’s a small detail that can make a big difference, especially when it comes to ensuring the finished part can be removed from the mould.
What is a Draft Angle?
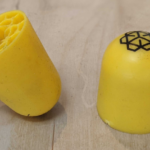
A draft angle is a slight taper applied to the vertical faces of a moulded part. It helps the part release from the mould cavity without sticking, scraping or dragging – all of which can damage the part or the tool.
Think of a sandcastle bucket. If it’s perfectly vertical, the sand tends to stick. But with a slight taper, it lifts off cleanly. The same principle applies in injection moulding.
A draft angle should be applied to both the core (male) and cavity (female) sides to help maintain consistent wall thickness throughout the part. Where applicable, draft should be added to both internal and external faces to ensure smooth release from the tool.
Why Draft Angles Are Essential
When the molten plastic cools, it shrinks slightly and grips the mould walls. Without a draft angle, that grip can be too tight, making the part difficult or impossible to eject cleanly.
The result? Parts that are scuffed, warped or even broken. Ejection issues can also cause delays, increased wear on the tooling, and added cost.
How Much Draft Do You Need?
As a rule of thumb, most vertical faces need a draft angle of between 0.5 and 1.5 degrees. The exact amount depends on:
- Part depth – The deeper the face, the more draft you’ll need.
- Surface finish – Smooth surfaces may require less draft, while textured surfaces often need even more to avoid drag marks.
- Material type – Some polymers shrink more than others or tend to stick to tool surfaces.
Real-World Example
Imagine designing a box-shaped enclosure without any draft on the side walls. It might look fine in CAD, but once moulded, it’s likely to stick in the tool. By simply adding a 1° taper to each wall, you allow for smooth ejection without compromising the function of the part.
Design Tip
Always apply draft early in the design process. It’s much easier to build it in from the start than to go back and modify complex geometry later.
Got a part in development?
We’re here to help you get the draft angles right from the start. Send us your CAD file or get in touch for advice on designing for successful moulding. As a rule of thumb, the earlier we are involved, the easier and faster the process is – it may also save money in the long run.

What CNC Machining Can’t Do: A Designer’s ...
31 March 2026 Comments Off on What CNC Machining Can’t Do: A Designer’s Guide to the Real Constraints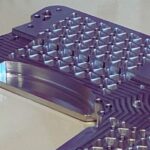
CNC Machining for Prototypes: Speed, Accuracy and ...
25 March 2026 Comments Off on CNC Machining for Prototypes: Speed, Accuracy and Material Choice
PSLA vs SLA vs DLP | Resin ...
18 March 2026 Comments Off on PSLA vs SLA vs DLP | Resin 3D Printing Comparison
New Larger CNC Billet Expands 3-Day and ...
10 March 2026 Comments Off on New Larger CNC Billet Expands 3-Day and Production Capacity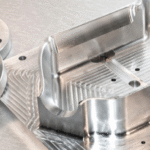
Stainless Steel 304 vs 316 for CNC ...
5 March 2026 Comments Off on Stainless Steel 304 vs 316 for CNC Machining: When Does the Upgrade Make Sense?


Understanding the Difference Between CNC Milling and ...
15 April 2025 Comments Off on Understanding the Difference Between CNC Milling and CNC Turning for Better Design Choices